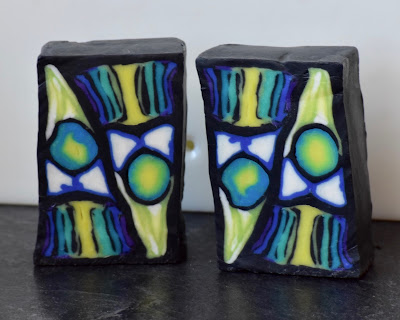
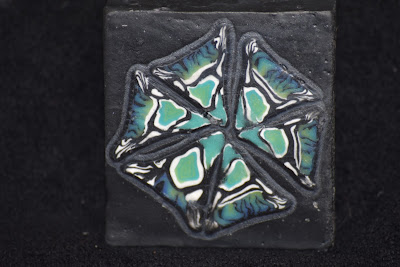
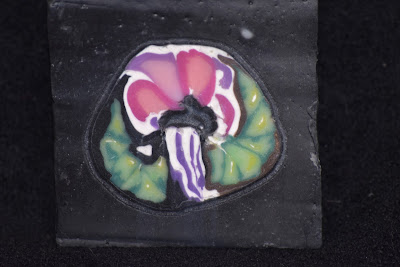
We had a soap dough challenge and the things people made...! They were so lovely and some were so very intricate. Doing all the work is not for everyone, nor for every day, but when you want to make something special, you can certainly pull out all the stops. I did not make any of these, for the record.
Saturday, March 3, 2018
Tuesday, February 6, 2018
Reducing soap canes is not easy
I tried again to make a bigger cane of soap dough, then try to reduce it. I put it together and then let it sit for a day so all the different colors and different pieces would be the same temperature and about the same stiffness. I started to reduce it but it clearly was not going to go well, so I stopped and used what I had to make a bar. I am certainly no pro when it comes to polymer clay techniques so it's possible to key lies in my hands and not in the fact that this is soap versus clay. I feel like I'm doing things fairly properly based on the videos I've watched but for the time being, I am going to reduce each element down individually before I put them together and once the total design is together but small enough to start with, then I will try to reduce it further. Kind of bummed since reducing can take a fair amount of time so reducing each element instead of being able to reduce the whole from the start adds time to an already time-consuming process. Sniff.
I tried again to make a bigger cane of soap dough, then try to reduce it. I put it together and then let it sit for a day so all the different colors and different pieces would be the same temperature and about the same stiffness. I started to reduce it but it clearly was not going to go well, so I stopped and used what I had to make a bar. I am certainly no pro when it comes to polymer clay techniques so it's possible to key lies in my hands and not in the fact that this is soap versus clay. I feel like I'm doing things fairly properly based on the videos I've watched but for the time being, I am going to reduce each element down individually before I put them together and once the total design is together but small enough to start with, then I will try to reduce it further. Kind of bummed since reducing can take a fair amount of time so reducing each element instead of being able to reduce the whole from the start adds time to an already time-consuming process. Sniff.
Sunday, January 21, 2018
Well, I made a soap using my soap dough caning to get the fine stripes. That layer, which I showed in the last post, is the bottom layer. I like the effect although I remain hesitant about whether I made the best use of it with the rest of the design. Nonetheless, someone will be very happy to use these bars.
I am waiting for my new batch of dough to come of age and then I will be trying some other things with it, related to but not exactly like caning. I will say that for all the work that goes into it, it is likely best used to add a small effect or just an element to a soap. Hand-manipulating enough dough to make a number of bars is not something I would do regularly, although I would not hesitate to do it for a special batch, if I had a really good idea. That would be a 4 bar batch most likely, rather than anything large.
I wish it were easier to show the lines in the other soap but I can't get them on camera. They do make for some pretty curls and cut-off though.
Friday, January 19, 2018
A different effect using soap dough and polymer clay techniques
I made a small bit of blue and white striped soap, using the stacking, reducing, stacking and reducing again, like in polymer clay. I loved the effect so I decided to try building a soap using it. I have a few other bits I made; one is black and white and looks okay and the other looks a lot like bacon. I have to figure out how I want to place those in a bar so I don't have pics of those. I had a wide variety of colors so I built a four bar block, trying to get fine but distinct lines of color. In some places, I just did not get much definition because of my attempts to shift the colors from one piece to the other . I think doing these types of stripes shows best with high contrast colors but it was effective even with similar colors, just with less distinction. By the time you layer, reduce, stack etc. you can get extremely fine lines of color and lots of them. It took a long time to do all the layers because reducing it is somewhat time-consuming but in terms of finding new ways to get a specific effect, it was worth it.
Because I hand built the block, the exterior isn't straight nor are my corners great but I love how the outside of the block looks. I wish I could get that look throughout. The lines inside are even and straight, which is supposed to happen with proper reducing but I would like to be able to achieve the more organic look of the outside all through the bar. From my other experience, that likely means trying to reduce it with uneven softness in the colors and manhandling the dough more. On the agenda for the weekend is making more dough.
I see that I will need to pull out my DSL camera to get a better and closer picture of the lines. Cell phone just doesn't do the trick.
I got my camera out and took these to show the fine lines you can get. Each of these pieces is only about 3/4 of an inch thick. This could make for an excellent woodgrain soap, if you wanted to put the time into it.
Saturday, January 6, 2018
Caning and Using Soap Dough like Polymer Clay
I have been wondering about the use of soap in the same way that polymer clay is used to create effects. I tried once before but used "hot" soap, which is not saponified at all. I used tapioca starch to prevent sticking but it required quite a lot while I was working and overall, it was not worth the effort.
I tried again recently using saponified soap dough. Having never worked with polymer clay, I watch a lot of videos of people working with it, trying to imagine the same with soap dough. Having just started down this path, I am finding that, so far, many of the same issues and rules apply. The same basic canes can be built and used together to form interesting patterns and beautiful things. I do not own a pasta machine but working with the dough I have, I am not confident that sheets of soap dough could be processed 30 times over and over to make a Skinner roll without making a mess of the machine; my dough was sticky enough with repeated rolling that a lot of corn starch or tapioca starch or some powder would need to be used to prevent sticking and that much would affect the finished product. I rolled my soap dough out between sheets of plastic wrap, which worked well and allowed for a lot of manipulation without having to dust it. It is possible to make a Skinner roll by hand. It's possible that sending it through a pasta machine between plastic sheets would work, although I can see the possibility of the sheets tearing and making a gunky mess.
It is a pretty labor intensive project, which I assume the case to be with polymer clay as well. I learned the hard way about all the pieces being of the same temperature and softness. I had made a large flower cane and then made the leaves to surround it but did not wait for long enough for the leaves, which had just been worked, to cool and stiffen to match the flower. Holy hell, did I end up with a mess when trying to reduce it. The leaves squished splendidly but the most inside part of the flower refused to move at all, which results in an oddball flower. I got kind of pissed and forced half of my very short and wide cane (about 2.5-3 inches across) to reduce down to about an inch and changed the shape from round to square but there is nothing left of the original image in there. It's now abstract art. The other half remained in its oddball shape and got imbedded.
I don't know how big a cane one can start with and successfully reduce, or how much one can reduce and still see the image intended. I have a feeling that soap will not act entirely like polymer clay but time will tell. I have found that soap with opaque colorants, like TD, give the best and sharpest lines and clear colorants give the least. Some of the micas didn't bring the level of distinction I was expecting, even when I heavily colored the batter, but figuring this out is part of the fun. I was able to take a simple roll that was 1-2 inches long and reduce it by pressure and rolling to nearly a foot long. I took the cane I made for the kaleidoscopes from 1-2 inches to 6 inches with fair success but so far I felt like I got the best results from a doubling, and not more, by going from 3 inches to 6 inches and then cutting.
It doesn't require much to start. I used mainly a roller and plastic wrap, although I did splurge to get some high tech equipment- a Play-doh Fun Factory- to be able to extrude some shapes. It's a pain to clean out though so I didn't use it as much as I intended, although there is a lot of potential there as well.
The bars look better in real life. Really.
Subscribe to:
Comments
(
Atom
)


