Keep at it
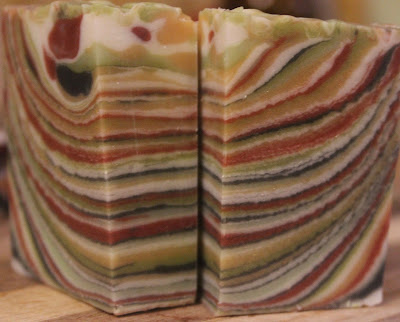
In my attempts to get a Fordite type soap, I have run up against nothing but obstacles. Yesterday, I had to remind myself to keep my head and instead of throwing up my hands, to work somehow with what I had going on, which was thick soap. I made this, which I like a lot and it reminds me of the Scooby Doo Mystery Machine because of the colors.
I had a few other botches and decided to just squish the trimmings together to be used as little bathroom soaps and I like those too. They aren't quite hard so they got a little smeary with handling but the colors will sharpen up once they are fully hard, and they will clean hands perfectly well.
Howler Soap
Sunday, February 10, 2019
Sunday, February 3, 2019
Oh Fordite, how you elude me
Bah. Fordite seems like it should be something you can do in soap, yet it eludes me. I can't get the layers thin enough and part of why is that the pour takes so long that the batter thickens up by the end. The fineness of the lines is something I have seen only in a swirl made of numerous lines of color that are then pulled at least twice but Fordite doesn't have any pulled pattern to it. It is just layers or the thinest of concentric circles. What to do, what to do.....
My batter got just a touch applesaucy while I was pouring, which made the lines less crisp. Such a shame.
Try, try again.
This gets closer but is just not right. Perhaps it's the color choice or maybe that I gelled.
Here's the real deal.
Wednesday, January 30, 2019
Fissured Soap/Lightning Soap
I haven't been making soap really at all for months. On our forum, we are doing casual challenges and my turn had come so I decided to post about a technique I started years ago to make a more natural looking marble in soap. It's not got the sexy curves and rhythm of swirled soap but nature doesn't always work in curls. It sometimes gives us cracks and jagged lines, like lightning or a vein of gold within rock or tree branches. I like that look but trying to make fluid soap look like that is an uphill battle. Thankfully, soap develops a more crystalline structure as it sets and as it cures so it can be taken advantage of to give very natural fissures.
I have been thwarted by my camera in making a video so pictures will have to do. I made this soap in a slab mold but the first time I used it was in a loaf mold. At that time, I used a flatter spoon to dig into the soap and lever up a chunk so it would break along the natural lines of the firm soap while allowing the contrasting soap to fill in the crack and did this in a number of places in the loaf, trying to be certain to sometimes crack all the way to the bottom of the mold. If you dig around too much or do it when the soap is too soft, all you get is a bunch of small pieces swimming in contrast, which has its merits but won't look anything like a fissure/crack/lightning.
To get fissures, you have to create them which means a different manipulation than usual. A silicone mold is perfect, but you could also line a hard mold with a plastic bag, just like you did back when you were starting and didn't have 400 pieces of equipment like you do now. Harken back to your roots, pull out the grocery store plastic bag and a box and you are good to go.
I use a slow tracing recipe, an accelerating FO, and a colorant in water (TD in water gives excellent results.)
Decide on your colors. I use a color in water to get into the fine lines and if you are using TD or AC, I put those to soak in water well ahead of time so they can absorb whatever water they want. I can add more water as needed to get a nice fluidity.
Get your recipe to emulsion and pour off a small amount BEFORE YOU ADD ANY FO. This will be used as the filler for the cracks, so you can color it after pouring off to get whatever contrast you would like. Stir it occasionally.
The rest of your batter will then be the base. Color as desired and then add the accelerating FO and stir it up well. You don't want a seize though. Get it into your mold before it's lumpy and mashed potatoes because you want it to firm up in the mold, not in the bowl. Of course in this run, I added Plumeria and Ahoy Matey which both move like gangbusters but they decided to play against me and remain soft for a long time.
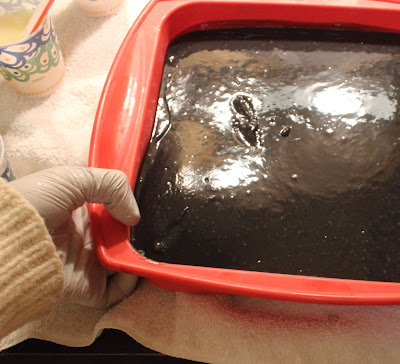
Slide your fingers under the mold and flex it to break the surface of the soap. Because the batter was moving so slowly, I have plenty of pictures of how it looks as it SLOWLY firms up.
Oh for god's sake, will you set, damned base!?!?
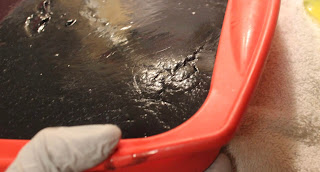
You can see some of the fissures staying in the surface, but I want a break all the way to the bottom along the lines that the firm soap gives me. If you lose patience, as I did, you can take a spoon or other implement to try to jimmy up a section but this is still too soft. Ahoy Matey, you failed me.
Once it starts to break better, I make sure I am cracking it all the way down to the bottom of the mold. I added more thin batter and more TD in water to make certain it gets into every nook and cranny. You can make tons of fissures or just a few of course. This soap stayed too soft for what I wanted but it works in the end. It looks a mess when I'm satisfied with the fissuring but that is how you get it into all the spaces. Don't worry!
After gelling, if you prefer, or when it's unmolded, either rinse off or cut off the very top layer to reveal.....Fissured Soap.
I haven't been making soap really at all for months. On our forum, we are doing casual challenges and my turn had come so I decided to post about a technique I started years ago to make a more natural looking marble in soap. It's not got the sexy curves and rhythm of swirled soap but nature doesn't always work in curls. It sometimes gives us cracks and jagged lines, like lightning or a vein of gold within rock or tree branches. I like that look but trying to make fluid soap look like that is an uphill battle. Thankfully, soap develops a more crystalline structure as it sets and as it cures so it can be taken advantage of to give very natural fissures.
I have been thwarted by my camera in making a video so pictures will have to do. I made this soap in a slab mold but the first time I used it was in a loaf mold. At that time, I used a flatter spoon to dig into the soap and lever up a chunk so it would break along the natural lines of the firm soap while allowing the contrasting soap to fill in the crack and did this in a number of places in the loaf, trying to be certain to sometimes crack all the way to the bottom of the mold. If you dig around too much or do it when the soap is too soft, all you get is a bunch of small pieces swimming in contrast, which has its merits but won't look anything like a fissure/crack/lightning.
To get fissures, you have to create them which means a different manipulation than usual. A silicone mold is perfect, but you could also line a hard mold with a plastic bag, just like you did back when you were starting and didn't have 400 pieces of equipment like you do now. Harken back to your roots, pull out the grocery store plastic bag and a box and you are good to go.
I use a slow tracing recipe, an accelerating FO, and a colorant in water (TD in water gives excellent results.)
Decide on your colors. I use a color in water to get into the fine lines and if you are using TD or AC, I put those to soak in water well ahead of time so they can absorb whatever water they want. I can add more water as needed to get a nice fluidity.
Get your recipe to emulsion and pour off a small amount BEFORE YOU ADD ANY FO. This will be used as the filler for the cracks, so you can color it after pouring off to get whatever contrast you would like. Stir it occasionally.
The rest of your batter will then be the base. Color as desired and then add the accelerating FO and stir it up well. You don't want a seize though. Get it into your mold before it's lumpy and mashed potatoes because you want it to firm up in the mold, not in the bowl. Of course in this run, I added Plumeria and Ahoy Matey which both move like gangbusters but they decided to play against me and remain soft for a long time.
Slide your fingers under the mold and flex it to break the surface of the soap. Because the batter was moving so slowly, I have plenty of pictures of how it looks as it SLOWLY firms up.
Oh for god's sake, will you set, damned base!?!?
You can see some of the fissures staying in the surface, but I want a break all the way to the bottom along the lines that the firm soap gives me. If you lose patience, as I did, you can take a spoon or other implement to try to jimmy up a section but this is still too soft. Ahoy Matey, you failed me.
It's getting there, after 20 minutes of frustration. I poured on the contrasting thin batter and worked to get it all the way into the crack. The I added the TD in water to get into the finest lines and into the larger cracks as well, for interest. Pour on more as you go.
Finally getting to how it's supposed to go!
Once it starts to break better, I make sure I am cracking it all the way down to the bottom of the mold. I added more thin batter and more TD in water to make certain it gets into every nook and cranny. You can make tons of fissures or just a few of course. This soap stayed too soft for what I wanted but it works in the end. It looks a mess when I'm satisfied with the fissuring but that is how you get it into all the spaces. Don't worry!
After gelling, if you prefer, or when it's unmolded, either rinse off or cut off the very top layer to reveal.....Fissured Soap.
I cut mine into bars and then turned a few bars into soap stones.
Saturday, March 3, 2018
We had a soap dough challenge and the things people made...! They were so lovely and some were so very intricate. Doing all the work is not for everyone, nor for every day, but when you want to make something special, you can certainly pull out all the stops. I did not make any of these, for the record.
Tuesday, February 6, 2018
Reducing soap canes is not easy
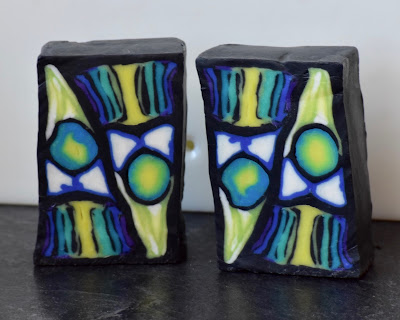
I tried again to make a bigger cane of soap dough, then try to reduce it. I put it together and then let it sit for a day so all the different colors and different pieces would be the same temperature and about the same stiffness. I started to reduce it but it clearly was not going to go well, so I stopped and used what I had to make a bar. I am certainly no pro when it comes to polymer clay techniques so it's possible to key lies in my hands and not in the fact that this is soap versus clay. I feel like I'm doing things fairly properly based on the videos I've watched but for the time being, I am going to reduce each element down individually before I put them together and once the total design is together but small enough to start with, then I will try to reduce it further. Kind of bummed since reducing can take a fair amount of time so reducing each element instead of being able to reduce the whole from the start adds time to an already time-consuming process. Sniff.
I tried again to make a bigger cane of soap dough, then try to reduce it. I put it together and then let it sit for a day so all the different colors and different pieces would be the same temperature and about the same stiffness. I started to reduce it but it clearly was not going to go well, so I stopped and used what I had to make a bar. I am certainly no pro when it comes to polymer clay techniques so it's possible to key lies in my hands and not in the fact that this is soap versus clay. I feel like I'm doing things fairly properly based on the videos I've watched but for the time being, I am going to reduce each element down individually before I put them together and once the total design is together but small enough to start with, then I will try to reduce it further. Kind of bummed since reducing can take a fair amount of time so reducing each element instead of being able to reduce the whole from the start adds time to an already time-consuming process. Sniff.
Sunday, January 21, 2018
Well, I made a soap using my soap dough caning to get the fine stripes. That layer, which I showed in the last post, is the bottom layer. I like the effect although I remain hesitant about whether I made the best use of it with the rest of the design. Nonetheless, someone will be very happy to use these bars.
I am waiting for my new batch of dough to come of age and then I will be trying some other things with it, related to but not exactly like caning. I will say that for all the work that goes into it, it is likely best used to add a small effect or just an element to a soap. Hand-manipulating enough dough to make a number of bars is not something I would do regularly, although I would not hesitate to do it for a special batch, if I had a really good idea. That would be a 4 bar batch most likely, rather than anything large.
I wish it were easier to show the lines in the other soap but I can't get them on camera. They do make for some pretty curls and cut-off though.
Friday, January 19, 2018
A different effect using soap dough and polymer clay techniques
I made a small bit of blue and white striped soap, using the stacking, reducing, stacking and reducing again, like in polymer clay. I loved the effect so I decided to try building a soap using it. I have a few other bits I made; one is black and white and looks okay and the other looks a lot like bacon. I have to figure out how I want to place those in a bar so I don't have pics of those. I had a wide variety of colors so I built a four bar block, trying to get fine but distinct lines of color. In some places, I just did not get much definition because of my attempts to shift the colors from one piece to the other . I think doing these types of stripes shows best with high contrast colors but it was effective even with similar colors, just with less distinction. By the time you layer, reduce, stack etc. you can get extremely fine lines of color and lots of them. It took a long time to do all the layers because reducing it is somewhat time-consuming but in terms of finding new ways to get a specific effect, it was worth it.
Because I hand built the block, the exterior isn't straight nor are my corners great but I love how the outside of the block looks. I wish I could get that look throughout. The lines inside are even and straight, which is supposed to happen with proper reducing but I would like to be able to achieve the more organic look of the outside all through the bar. From my other experience, that likely means trying to reduce it with uneven softness in the colors and manhandling the dough more. On the agenda for the weekend is making more dough.
I see that I will need to pull out my DSL camera to get a better and closer picture of the lines. Cell phone just doesn't do the trick.
I got my camera out and took these to show the fine lines you can get. Each of these pieces is only about 3/4 of an inch thick. This could make for an excellent woodgrain soap, if you wanted to put the time into it.
Subscribe to:
Comments
(
Atom
)


